Sunday, 17 February 2013

Create Custom Content Type using Elements.XML in SharePoint 2010


Below are the steps to create a custom Content Type using .Net & deploying the package in the SharePoint 2010 Server.
 
       1.  Open Visual Studio & Select the Empty SharePoint Project.

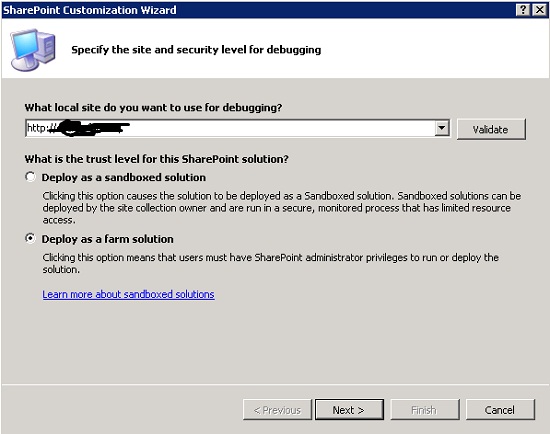
     2.    After giving the Proper Name to the Project, the next screen appears asking to deploy the solution as Sandboxed or Farm level. Select Deploy as Farm Solution

     
          3.    The Default Solution will look as shown below.


         4.     In the given solution we need to add a content type to create a custom content type. Right Click on the Solution to add a new content type as shown below.


           5.    Select Content Type & give it a proper name as shown below.

  
           6.    The popup to choose the base content type will appear as shown below


        7.    Select “Item” as base content type from the drop down or any other content type according to the requirements as shown below.


        8.    After selecting the base content type click on “Finish” button. Now the solution will appear in which the Elements.XML file is opened in the solution of that particular content type as shown below.


      9.    Now in the given Elements.XML file we need to add the columns to bind them with our custom content type. Here we can add the default SharePoint columns by using their ID’s. But now in this case we will first create the custom Site Columns & then bind them with the Custom Content Type. We can define the site columns in the same Elements.XML file of the content type after the <ContentType></ContentType> tag but before the closing </Elements> tag as shown below.

The code for the same is as follows
 
<!--Create Custom Site Columns -->
<!--Site Column of type "Text"-->
<Field ID="{2FA325B0-B884-4AAB-8E60-E9AA48AA97F3}" Type="Text" Name="DemoName" DisplayName="DemoName" Required="False" Sealed="TRUE" Group="Custom Columns"/>
<!--Site Column of type "Number"-->
<Field ID="{30C7137C-7320-4603-8F54-B8043C3AAF49}" Type="Number" Name="DemoValue" DisplayName="DemoValue" Required="False" Sealed="TRUE" Group="Custom Columns"/>
<!--Site Column of type "Choice for DropDown"-->
<Field ID="{38A52E05-59EB-4FA8-AEB4-5739AD6562F3}" Type="Choice" Name="DemoType"  DisplayName="DemoChoiceType" Sealed="TRUE" Group="Custom Columns">
<CHOICES>
       <CHOICE>Internal</CHOICE>
       <CHOICE>External</CHOICE>
</CHOICES>
</Field>
<!--Site Column of type "Currency"-->
<Field ID="{34814490-405E-4CC5-A200-1934266F59F8}" Type="Currency" Name="DemoAmount" DisplayName="DemoAmount" Decimals="2"Min="0" Required="FALSE" Group="Custom Columns" />
<!--Site Column of type "Date & Time" & contains today's date as default date-->
<Field ID="{19BFDCF6-2B4C-4666-9D8C-B933C0B1DF5D}" Type="DateTime" Name="DemoDate" DisplayName="DemoDate" Format="DateOnly" Required="FALSE" Group="Custom Columns">
<Default>[today]</Default>
</Field>
<!--Site Column of type "Lookup" which reads values from other list created in the same solution-->
<Field ID="{BF2FCD32-5A68-4E8C-9DB3-C785D8279DD4}"  Type="Lookup" Name="DemoLookupField" DisplayName="DemoLookupField"  Hidden="FALSE" Required="FALSE" Sealed="FALSE" Group="Custom Columns" List="Lists/LookupListInstance" StaticName="DemoLookupField" ShowField="Title" WebId="~sitecollection" Overwrite="TRUE" />

While creating the Site Column we have to give every field a unique ID. After copying &changing the ID’s of all the site columns, the solution will look as given below.

      10.    After creating the site columns we have to bind them in our custom content type. To achieve this we have to give the site column’s reference in the <FieldRef></FieldRef> which is present inside <ContentType></ContentType> tag. To add the reference of the fields we have to give the ID of the site column & the Name on the field defined in the Site Columns.
The code for the same is as follows.

<!--Create Field References to the Defined Content Type-->
<FieldRef ID="{2FA325B0-B884-4AAB-8E60-E9AA48AA97F3}" Name="DemoName" DisplayName="DemoName" Required="False"/>
<FieldRef ID="{30C7137C-7320-4603-8F54-B8043C3AAF49}" Name="DemoValue" DisplayName="DemoValue" Required="False"/>
<FieldRef ID="{38A52E05-59EB-4FA8-AEB4-5739AD6562F3}" Name="DemoType"  DisplayName="DemoChoiceType" />
<FieldRef ID="{34814490-405E-4CC5-A200-1934266F59F8}" Name="DemoAmount"  DisplayName="DemoAmount" />
<FieldRef ID="{19BFDCF6-2B4C-4666-9D8C-B933C0B1DF5D}" Name="DemoDate"  DisplayName="DemoDate" />
<FieldRef ID="{BF2FCD32-5A68-4E8C-9DB3-C785D8279DD4}" Name="DemoLookupField"  DisplayName="DemoLookupField" />

The FieldRef ID & the Name should match with the ID & Name of the site column defined below it. After adding the Field References the solution will look as follows.

      11.    Now the next step is to build the solution & deploy it in your SharePoint Web Application. After deploying the solution we can find these columns created in the Custom Columns Group in the Site Columns page as shown below


        Also the Content type is created iunder the Custom Content Types Group as shown below


Tuesday, 12 February 2013

Create Custom Content Type using custom .Net code in SharePoint 2010


Below are the steps to create a custom Content Type using .Net & deploying the package in the SharePoint 2010 Server.

1    1. Open Visual Studio & Select the Empty SharePoint Project.


2. After giving the Proper Name to the Project, the next screen appears asking to deploy the solution as Sandboxed or Farm level. Select Deploy as Farm Solution


3. The Default Solution will look as shown below.


4. In the given solution we need to add a feature to create a custom content type. Right Click on the Features to add a new Feature as shown below.


5. After adding the feature, rename the feature with proper Naming Convention. I have renamed it as Custom_ContentType.


6. We need to add an Event Receiver in the Custom_ContentType feature to create a content type using .Net code.


7. After adding the Event Receiver your solution will look as shown below.


8. We need to write the code in the Custom_ContentType_EventReceiver.cs file to create the content type. The Default code in the Event Receiver file generated on creating it is shown below


Now in the given file we have to add the code to create the feature for activating & deactivating events.

Copy the below given code in the given class file i.e. here it is “public class Custom_ContentTypeEventReceiver : SPFeatureReceiver”

In the below code we have created one custom site column with the unique ID. Hence after copying the below code please create a new ID for site column. Same way we can create a number of custom Site Columns required for the specific content type. We will add this content type to the Announcement list through code itself. To add this content type to other lists we can do so through the site.


public class Custom_ContentTypeEventReceiver : SPFeatureReceiver
{
  //This GUID uniquely idenitifies the custom field
  public static readonly Guid MyFieldId = new Guid("B9EE12F5-B540-4F11-A21B-68A524014C44");
  //This is the XML used to create the field
  public static readonly string MyFieldDefXml ="<Field ID=\"{B9EE12F5-B540-4F11-A21B-68A524014C44}\"" +" Name=\"CustomName\" StaticName=\"CustomName\"" +" Type=\"Text\" DisplayName=\"Custom Name\"" +" Group=\"Custom Content Type Columns\" DisplaceOnUpgrade=\"TRUE\" />";

  public override void FeatureActivated(SPFeatureReceiverProperties properties)
  {
    //Get references to the site and web, ensuring correct disposal
    using (SPSite site = (SPSite)properties.Feature.Parent)
      {
        using (SPWeb web = site.RootWeb)
        {
          //Check if the custom field already exists.
          if (web.AvailableFields.Contains(MyFieldId) == false)
          {
            //Create new field
            web.Fields.AddFieldAsXml(MyFieldDefXml);
            web.Update();
          }
          //Check if the content type already exists.
          SPContentType myContentType = web.ContentTypes["Base Content Type Name e.g Announcements"];
          if (myContentType == null)
          {
            //Our content type will be based on the Annoucement content type
            SPContentType documentcontenttype = web.AvailableContentTypes[SPBuiltInContentTypeId.Document];

            //Create a new content type
            myContentType = new SPContentType(documentcontenttype, web.ContentTypes, "Content Type Using Code 1");

            //Add the custom field to it
            SPFieldLink newFieldLink = new SPFieldLink(web.AvailableFields["Custom Name"]);
            myContentType.FieldLinks.Add(newFieldLink);

            //Add the new content type to the site
            web.ContentTypes.Add(myContentType);

            ////Add it to the Announcements list
            SPList annoucementsList = web.Lists["Announcements"];
            annoucementsList.ContentTypesEnabled = true;
            annoucementsList.ContentTypes.Add(myContentType);
            annoucementsList.Update();
          }

        }
      }
    }

    public override void FeatureDeactivating(SPFeatureReceiverProperties properties)
    {
      //Get references to the site and web, ensuring correct disposal
      using (SPSite site = (SPSite)properties.Feature.Parent)
      {
        using (SPWeb web = site.RootWeb)
        {
          //get the custom content type
          SPContentType myContentType = web.ContentTypes["Base Content Type Name e.g Announcements"];

          if (myContentType != null)
          {
            ////Remove it from the Announcements list
            SPList annoucementsList = web.Lists["Announcements"];
            annoucementsList.ContentTypesEnabled = true;
            SPContentTypeId ctID = annoucementsList.ContentTypes.BestMatch(myContentType.Id);
            annoucementsList.ContentTypes.Delete(ctID);
            annoucementsList.Update();

            //Remove it from the site
            web.ContentTypes.Delete(myContentType.Id);
            web.Update();

            try
            {
              //Remove the field
              web.Fields.Delete("CustomName");
              web.Update();
            }
            catch
            {
              //Field was not in the collection
            }

          }
        }
      }
    }
}


9. After writing the code, now build & deploy the solution in the SharePoint Site.
In the SharePoint Site after activating the feature, automatically the content type will be created in the site.